Westfield Megabusa Build Diary
Yes, it did turn up before Christmas, everything required did, much to our relief...just the exhaust and digital dash are still to come now!
After running the wiring loom correctly around the car and to the rear through the drivers side of the transmission tunnel we just finished it off after a trial fit of where the diff would sit just to see where best to run the final part of the loom right across the rear from drivers side to passenger side. The clearance is huge between the diff and loom so we went ahead and drilled the required holes and riveted the clips and then left the cable ties loose just in case things needed a last minute adjustment. What we deemed to be daunting (the wiring loom) turned out to be very, very straightforward thanks to how neatly the wiring comes.
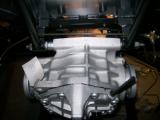
Anyway the diff....
A late start today as Laurence got back from a weekend in Dublin late, so not much of an opportunity to get much done. The diff is fairly heavy - heavy enough to be awkward to get in position without scratching the chassis or a brake pipe, but its not overly heavy. I just lifted it into position and Laurence put the rod studs through the holes to support it whilst we found the necessary nuts to tighten it and then it was literally a case of just tightening and torquing it up. Fairly straightforward job. It was very cold tonight, so we just left one of the propshafts until tomorrow!
The diff stud nuts have a habit moving down the thread on one side, but not the other, leaving the stud unevenly spaced. The best way to stop this happening is to tighten one side to where you want the bolt to finish on the thread, then put another nut on behind it. You then tighten this nut against the other and this will prevent the nut from moving any further down the thread - allowing you to tighten the other side easily.
Matt
 |