Westfield Megabusa Build Diary
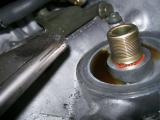
Carrying on from the other night, to remove the oil filter I tried using an oil filter wrench which is basically a strap which wraps around the filter, and then a ratchet is used to tighten the strap on to the filter and the twisting motion breaks it free. It doesn't work though because the filter is done up 2 whole turns after the seals touch - it's normally half a turn on a car, so it's very, very tight!
Eventually, a huge plumber wrench does the job by crushing the filter to get a grip on it, and then it just twists off. Now with the filter removed I can remove the bolt that was being blocked by the filter, and fit the oil pump bracket to the engine, but the bracket doesn't fit that well when you try and secure it to the engine, and I had to open up a couple of the holes a little. Even with this, it's still not a great fit. The trick eventually was to get all of the bolts in place very loosely, and then tighten each one a bit at a time which shapes the bracket to fit.
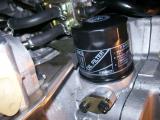
Everything looks fine until I try to fit the new oil filter, but it fouls the oil pump bracket. The only choice is to shave the edge off the bracket, but directly beneath is the open oil filter thread. I don't want swarf getting in, nor do I want to remove the bracket again due to its poor fit, so I cover the entire area over and begin filing. After a short while, enough of the bracket has been taken off and the filter fits just fine.
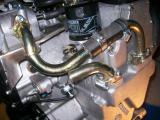
Now with the scavenge pump fitted, the oil pipes that come from the sump must be connected to the scavenge pump. This is quite fiddly because You can't get a ratchet to the Allen head bolts in some cases, so you have to use an Allen key a quarter-turn at a time, but you get there eventually. It was a process of elimination working out which pipe went where, but I got there in the end.
I then fitted the two metal pipes to the scavenge pump itself, again, using a process of elimination. This is even more fiddly though, and I had to file down the weld on one of the pipes as the small nut kept hitting the weld and wouldn't thread.
Now all that remains is to connect up the pipes using the flexible hose. The easiest way to do this is to slacken off the bolts on the metal pipes so you can move them around. This helps loads when trying to slip the flexible hose onto both ends of the metal pipes.
It wasn't long before I ran into a problem though - with the right-most pipes connected, the left pipe touches it. This is with all pipes not tightened - it will be impossible to tighten them further too. Something is wrong, so I'll have to speak to Westfield and find out if I have got the pipes fitted in the wrong places, or if the pipe(s) themselves are wrong!
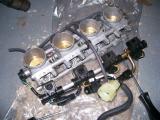
Just before I finished for the night, I remembered that Westfield need the Hayabusa wiring loom so that they can modify it, so I packed it up ready. In addition to this they need a section of the Hayabusa fuel rail. I understand that a bike runs lower fuel pressure, so they only feed fuel into the fuel rail. However a car runs higher fuel pressure, so the fuel rail must have a send AND a return, so they need the last section of fuel rail and they modify it into a T piece to form a return.
You need to unscrew the injectors and pull them out, then the fuel rail sections just pop out when you pull them. You need to send Westfield the left-most section in the picture below, which is the opposite side to the brass feed on the right.
Laurence
 |
 |
 |
 |
 |