Westfield Megabusa Build Diary
Tonight is a big night - we're going to try desperately to fire up the engine. I spoke to Dave @ Westfield today, and he confirmed that an adapter is needed to make the oil pressure sender fit, but they had forgotten to send it to us.
Mark said that it was not a good idea to start the engine without it which I was gutted about, but I had a plan. I looked at the wiring diagram for the Hayabusa engine and I could see that the oil pressure warning was very simple - the dash warning light is given a 12v feed, which then connects to the oil pressure switch, which then connects to earth, so when there is enough oil pressure the pressure switch breaks the path to earth, and therefore the circuit, which prevents the light coming on.
We decided we could use the oil pressure switch by giving it a 12v feed and placing a multimeter inline. With the engine off it reads 12v, so our theory is correct. We can happily use this as an indication of oil pressure. If it shows 0v then oil pressure is fine.
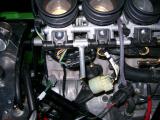
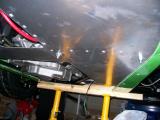
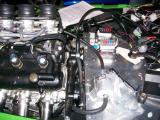
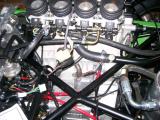
We had a lot of work to do though. We had our fuel rail at long last (3 months I think it took!!!) I connected the fuel rail segment to the throttle bodies. Also in the delivery was the M8 bolts and washers needed to bolt the engine down to the chassis. The holes were already drilled by me previously, but needed opening and adjusting slightly as they weren't quite perfect. Some of the bolts had to be fitted upside down as access was very tight, but we got around and tightened them all up.
Jonny was round to help us for the evening, so he and Matt finished the bolting down whilst I started connecting up the throttle bodies and the fuel pressure regulator to the fuel lines. I had trouble fitting the rubber lines to the solid lines that terminate by the passenger bulkhead as access was very tight, but Jonny was able to do it.
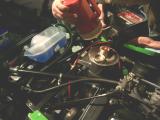
We fitted the water temperature sender and oil temp senders in their relevant locations, and then began to fill up the coolant. Matt put a cup of coolant in followed by a cup of water to get the mixture 50%. We were surprised at how quickly the expansion tank filled up. It seemed to fill up the expansion tank and then just stop without draining down into the pipes or the engine. You got the odd bubble now and then though, so we just squeezed all of the pipes. This moved a lot of air and the engine started to take the water from the tank. I was surprised at how little water the car took though.
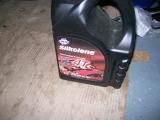
Whilst Matt was finishing the coolant, I filled up the oil tank with Silkolene Pro 4 10W40 which is a fully synthetic motorcycle engine oil. It's blood red in colour which looks awesome! The engine with dry sump takes around 6 litres.
Kriss and Dan popped over, then got bored so they went to the pub, so it's just Matt, Jonny and I. Kriss and Dan came back later on, saw no action, poked some fun at us, and then left again.
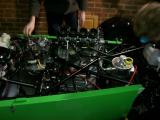
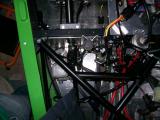
We had just a few things to do, but it was getting late. We double-checked that all of the sensors were connected, and that everything was clear of the prop shaft. We had some wiring to do with the connecting of the ECU loom to the main loom. Things like the gear position sensor and the rev counter had to be connected into the main loom, so I made up a block connector for this. It took a little while as it was in quite a fiddly location. We also had to run the power cables through a grommet along with the ECU loom. The last thing we needed to do was connect the ECU loom into the fuel pump fuse.
We went over everything one last time and then turned the ignition on - we heard the fuel force its way into the fuel rail and then back. We left it for 15 minutes as the manual says and inspected for leaks - there didn't seem to be any leaks at all. Result.
So here we go, the car is in neutral, the fuel system seems to work just fine, oil is in the engine, so lets give it a go...
I turn the key and it cranks for a few seconds, then fires into life. Wow it seems really loud. I let it run for a few seconds and then cut the engine.
"Did it start?" Matt asked. He thought I was cranking the whole time, but it was the engine running on its own steam, but obviously very rough. I got scared though which is why I turned it off so fast. I don't know why - I guess it's just such an expensive thing to have malfunction.
We are all very proud of ourselves, so we started it again, but for longer this time. The car settled down to a steady idle very quickly, and the oil pressure light is off, so that's good. We gave the throttle a couple of blips and were amazed by the throttle response.
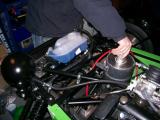
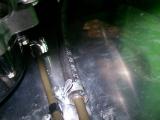
We cut the engine, talked for a bit, and then notice an oil leak. It was coming from the oil tank bottom outlet that feeds the sump. Tightening it is very difficult because there is a chassis rail in the way, but we manage it, or so we thought.
The leak is still there and we can't turn the boss any more because the chassis rail is obstructing it. It's getting late too. The only way we can do it is to remove the tank. I cleaned a bowl for the oil and we removed the hose that connects the tank to the sump and the oil slowly drained into it. Once empty, we removed the tank and tightened the boss as much as we could and clean up the oil on the chassis. We then refitted the tank, refilled it with oil, and then crossed our fingers that the leak had stopped.
We gave it another go, and left the engine running for a minute or two then stopped it. Wwwwooooooo! Lucky we did - massive oil leak! Worse still, the scavenge pump belt is on the floor. How the hell has that come off?
The oil leak was coming from the top of the scavenge pump that goes to the oil cooler. Jonny gets a spanner onto it and it turns out I've only tightened it finger tight. It takes ages to tighten due to such limited access, but Jonny did it eventually. Silly mistake, but this is why you start the engine and monitor it so closely before even thinking about hitting the road.
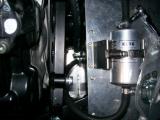
Looking at the dry sump instructions, I had forgotten to fit the front plate to the drive pulley, which is what retains the belt. The rear one was on, but the front one was missing. Sure enough, it was in the dry sump box along with the retaining bolts.
It's was way past our bed-time, and Matt had already had enough but Jonny and I just couldn't leave the car alone. I was hoping the engine didn't have to come out again to gain access to the pulley, but it was just a case of putting the engine into gear and then un-torquing the bolt that secures the drive pulley into place. Upon doing this, the pulley just pops out allowing us to fit the front plate to it, then we just popped it back into place.
We put the belt back on and then finished for the night. Jonny was a real asset tonight, and I doubt I would have got the engine started without his help. More importantly though, I went to bed on a high that the belt and pulley was sorted, instead of worrying that the engine might have to come out to gain access.
Laurence
 |
 |
 |
 |
 |
 |
 |
 |
 |
 |
 |
 |